Voice, Tone, and Style Framework
Master the framework that transforms scattered product copy into a unified communication system
Voice, tone, and style form the foundation of consistent product communication.
- Voice represents your brand's unique personality, the distinct character that remains constant across all touchpoints.
- Tone adapts this voice to different contexts and user emotions, shifting from celebratory to supportive based on the situation.
- Style encompasses the technical rules and standards that ensure clarity and consistency in your writing.
Together, these elements create a unified communication framework that builds trust and recognition. Understanding how voice stays consistent while tone flexes helps teams craft messages that feel both authentic and contextually appropriate. This framework becomes especially critical as products scale across multiple teams, features, and user journeys.
New products lack this historical data but have unique advantages. Start with foundational research: your mission, target audience personas, and competitor benchmarking.
Conduct interviews asking potential users: "How would you want this product to speak to you?" Test voice concepts through prototypes and early user testing before launch.
Validation is where both approaches meet. For existing products, audit whether your intended voice matches reality. For new products, test voice concepts with target users using sample content. Create voice variations of the same message and gather feedback. The goal isn't perfection; it's finding an authentic starting point you can refine through real usage.
After the
Start by listing 4-5 core attributes that capture your brand essence. For each attribute, write down what you are and what you aren't. "We are knowledgeable but approachable. We aren't condescending or overly academic." These pairs create clear guardrails for
Test attributes against real content scenarios. Can writers and designers easily apply them? Do they differentiate you from competitors? Strong attributes feel specific to your brand. For example, "confident but not arrogant" works better than generic descriptions like "professional." Include 2-3 example sentences demonstrating each attribute pair in action. This concrete guidance helps writers internalize abstract personality traits.
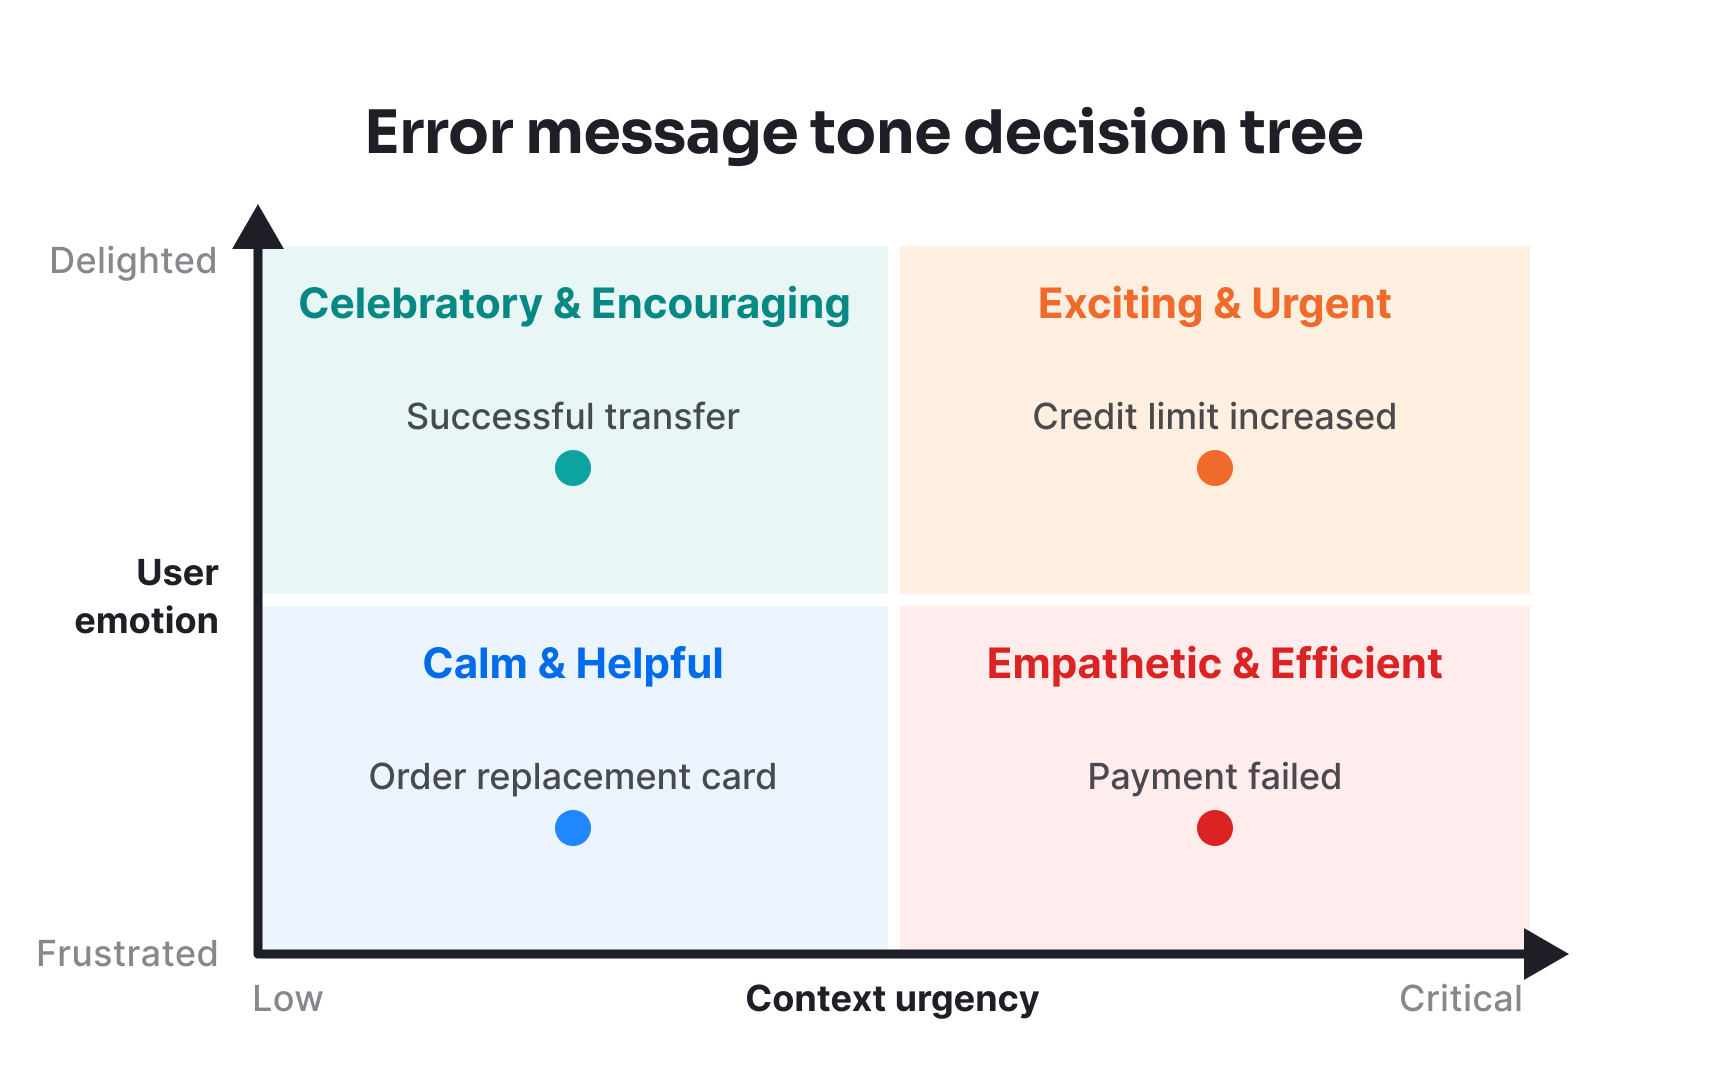
While voice stays consistent, tone is the emotional inflection that changes based on context. It's how your voice sounds happy, concerned, or matter-of-fact depending on the situation. Tone mapping ensures consistent emotional intelligence whether you're handling payment failures, celebrating achievements, or guiding new users.
To begin with, map scenarios along two axes: user emotion (frustrated to delighted) and context urgency (low to critical). Plot each scenario on your matrix, then assign the appropriate tone based on its position. A forgotten password (mild frustration + low urgency) falls in the "calm and helpful" quadrant. System outages (high frustration + critical urgency) land in "empathetic and efficient" territory.
Document specific language patterns for each tone. Celebratory might use exclamation points and dynamic verbs. Supportive avoids technical jargon and includes clear next steps. These concrete guidelines help you match the tone to the situation without lengthy deliberation.
Pro Tip: Include "never say" examples to prevent tone-deaf responses.
Writing principles form the technical foundation of your content design system:
- Establish maximum sentence lengths (e.g. 20 words), reading grade levels (e.g. 8th grade), and complexity scores for different
content types. - Define vocabulary tiers for your system. Tier 1 includes universal words everyone uses. Tier 2 contains product-specific terms users learn through onboarding. Tier 3 covers technical terms for advanced features. Document which tiers apply to different content types. For example, error messages use only Tier 1.
- Create reusable sentence patterns that become system components. "Can't [action] because [reason]" for errors. "[Number] [items] [status]" for counts. These patterns ensure mechanical consistency while allowing content flexibility.
Grammar standards ensure professional, error-free
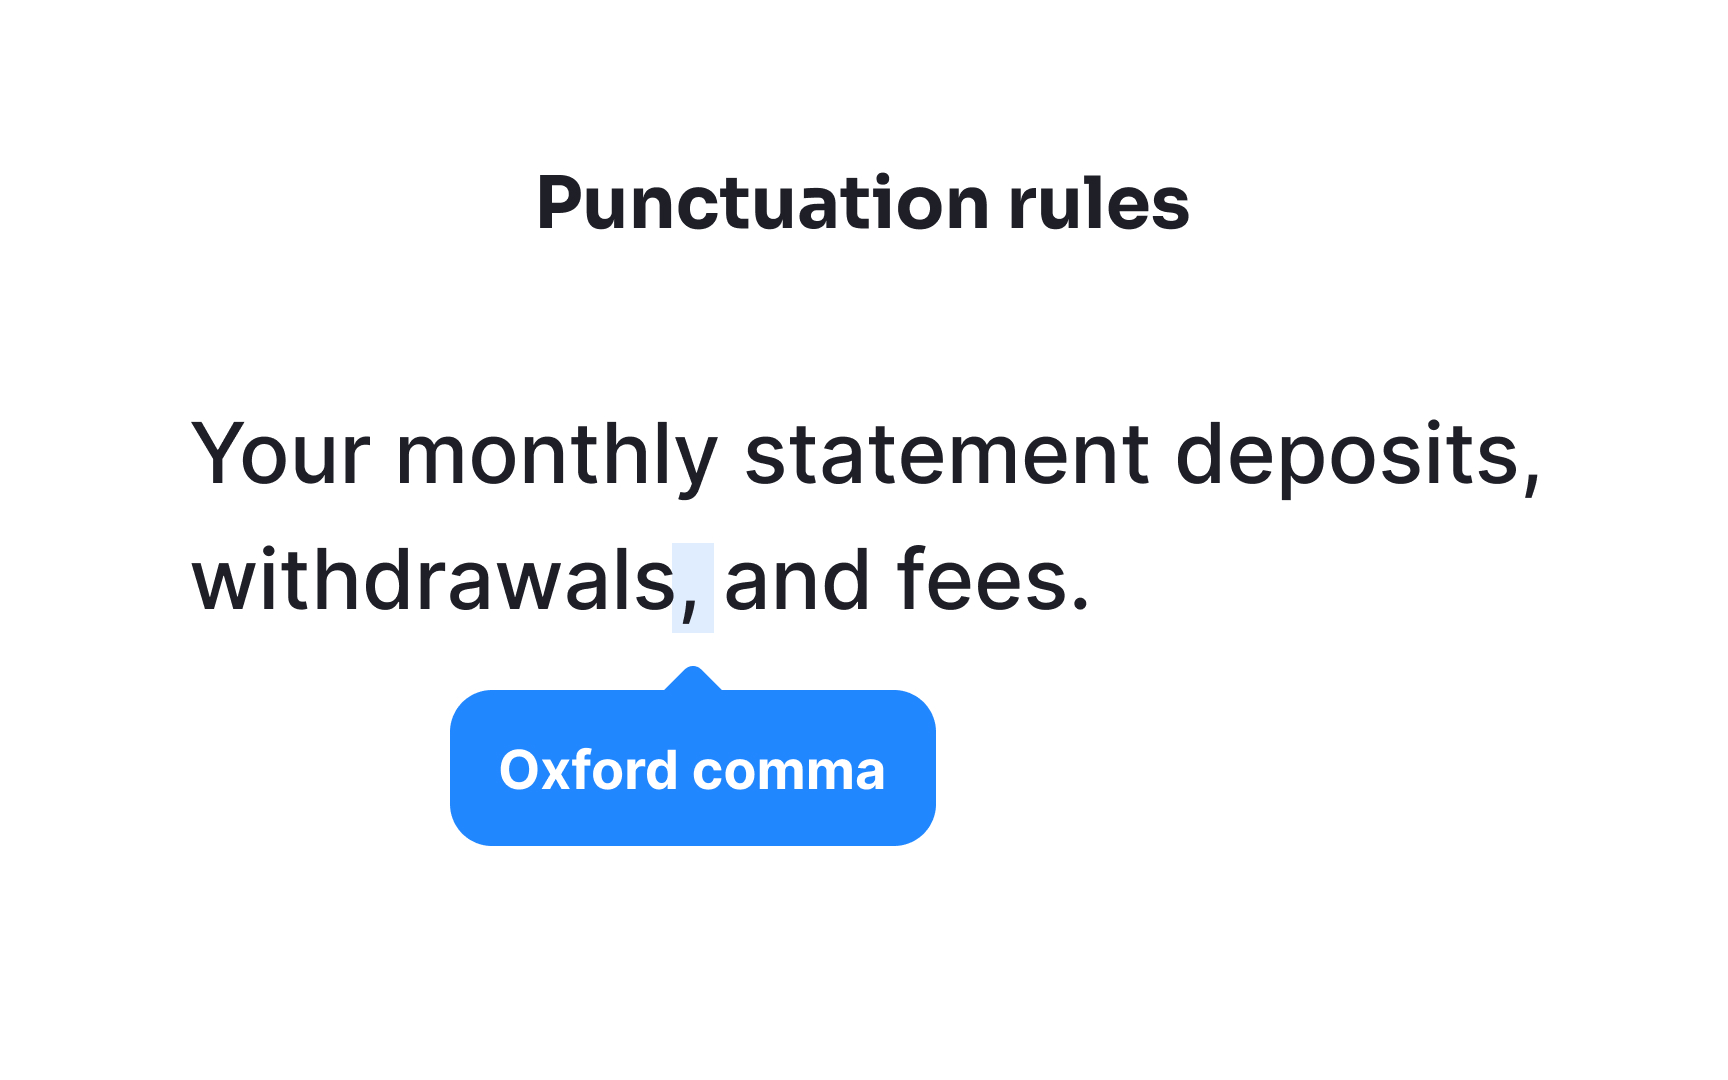
Define your approach to common grammar decisions: Oxford commas, contractions, and sentence fragments. Modern product copy often favors conversational elements like contractions ("you'll" versus "you will") for approachability.[1] Document these choices to prevent endless debates and revisions.
Address international variations explicitly. Choose between American and British English, then apply consistently. Consider how grammar choices affect localization and translation. Simple, standard constructions translate more accurately than idiomatic expressions or complex structures.
Punctuation in product copy follows specific patterns that differ from traditional writing. Create punctuation guidelines that align with your
Document punctuation patterns for content combinations. For example, when a header introduces a list, skip the colon. When
Build punctuation rules into your content templates and review checklists. Create fill-in-the-blank templates like "Can't [action] because [reason]." that embed correct punctuation. Include punctuation checks in your content QA process. It's easier to spot missing periods in a systematic review than during rushed production.
In practice, capitalization is one of the most common sources of inconsistency in product messaging, so clear guidelines save teams time and prevent visual confusion. Choose between sentence case (only first word capitalized: "Create new account”) and title case (each major word capitalized: "Create New Account") for different elements, then apply uniformly. Sentence case generally works best for modern interfaces. It's easier to read, more conversational, and translates better.[2] Reserve title case for proper nouns and specific
Build capitalization into your
Consider accessibility and internationalization when setting rules. Some languages don't use capitalization, making title case meaningless in translation. Keep in mind that screen readers can misinterpret ALL CAPS as acronyms. It also comes across as shouting and can be annoying for users to read.
Beyond grammar and punctuation, your style guidelines need to address formatting, numbers, dates, and specialized terminology. These standards ensure consistency in elements that significantly impact user comprehension and trust.
Clear rules prevent debates and speed up content creation:
- Define number formatting for different contexts. For example, spell out one through nine in
body text , but use numerals in technical specifications. - Standardize date formats considering international users. For example, "March 15, 2024" versus "15/03/24."
- Address currency, percentages, and time zones based on your user base.
- Decide when to bold key information versus using other highlighting methods.
- Establish patterns for introducing acronyms and whether to use periods in abbreviations.
Accessible and inclusive writing in
Map requirements to content types.
Create alt text patterns for decorative, informative, and functional images. Build glossaries for technical terms appearing across products. This ensures accessible, inclusive content scales with your system rather than requiring manual fixes.
References
Top contributors

Topics
From Course

Share


Similar lessons

Text & Media as Layers

Why Gamify?
