<?xml version="1.0" encoding="utf-8"?>

Figma's capabilities extend well beyond basic shapes. With vector networks, designers break free from the confines of standard shapes. They can intricately weave complex patterns, construct detailed infographics, or even craft icons that perfectly align with their project's theme. These networks offer the versatility to create shapes ranging from the simplest to the most complex, laying a flexible groundwork for innovation and imaginative design.

Moreover, Figma's boolean operations add another layer of creativity, enabling designers to merge, subtract, intersect, or exclude shapes, further expanding the potential to create unique, custom forms tailored to any project's specific needs.

Exercise #1

Vector networks

Vector networks

Unlike traditional pen tools that loop back to the start, Figma’s vector networks can branch out in any direction, all within the same object. This means you can craft complex shapes more swiftly and efficiently, all while maintaining consistent properties.

In Figma, tools like the Pen, Pencil, and various Shape tools let you harness the power of vector networks.

Activating and modifying vector networks:

  • Select your shape, then press Return (Mac) or Enter (Windows) or double-click the shape.
  • Alternatively, select the shape and double-click to enter the vector edit mode.

Once you're in vector edit mode, you can add, move, or adjust anchor points and paths to refine your shape. To exit vector edit mode, simply press press Return (Mac) or Enter (Windows) or select Done in the Toolbar.

Pro Tip: Once you're in Vector Edit Mode, remember that all changes or new points you add belong to the same vector network. This is true even if the points are spread out and don't seem connected.

Exercise #2

Pen tool

Pen tool

In Figma, the Pen tool, marked by a fountain pen icon in the Toolbar or accessed via the P shortcut, is your gateway to creating precise vector shapes and networks.

Start by clicking on the canvas to set your first anchor point (Point A). Then, drag your mouse to draw a path and establish another anchor point (Point B). The process involves placing nodes (small blue-lined circles) and connecting them with paths. As you work, a blue line dynamically links your last node to the cursor, visualizing the potential path.

Once you click again, a solid black line solidifies the connection between nodes. Continue this process, adding nodes and paths and shaping your design. When you're about to close the shape, a small filled black circle hints at the completion point. To finalize and exit, connect to the first anchor point and click Done in the Toolbar.

Exercise #3

Fills for vector shapes

Fills for vector shapes

To infuse color into closed areas of a vector network in Figma, follow these steps:

  • Select your vector network.
  • Enter edit mode by pressing Return (Mac) or Enter (Windows).
  • Activate the Paint Bucket tool by clicking its icon in the bottom toolbar or pressing Shift B.
  • Hover over a closed region within the vector network. The cursor will change to a droplet icon with a plus sign inside. Click to apply the fill. Once the area is filled, the icon will change to a minus, indicating you can click again to remove the fill.

You can apply different fills to multiple closed regions within the same network.

Pro Tip: To add color outside the vector network mode, simply exit the mode, select your shape, and then use the fill parameters in the right sidebar.

Exercise #4

Bézier curves

Bézier curves

Bézier curves help craft smooth, controlled curves in your vector designs.

Here's how to fine-tune your curves:

  1. Choose your vector network.
  2. Start edit mode by double-clicking or hitting Return (Mac) or Enter (Windows).
  3. If it's a curve, Bézier handles show automatically. For corners, press Command (Mac) or Ctrl (Windows) and click the point or use the Bend tool to display handles and create a mirrored curve.
  4. Modify the path by dragging the handles, shaping the curve as needed.

Bézier curves are essential for tasks like designing logos, icons, or detailed illustrations. They let you control the shape of each curve closely, making sure your designs are both beautiful and accurate.

Exercise #5

Rounded corners

Rounded corners

In Figma, smoothing corners is easy with the corner radius setting in the Design panel. Just select a shape, then either enter a pixel value or drag the arc icon to round all corners evenly.

For more control, enable independent corners, but this is only available for rectangles and frames. This lets you set a different radius for each corner using input fields, sliders, or number variables.

To round corners on vector paths, double-click to enter edit mode, select a point, and drag its handles. Note: corner radius only works on internal points of open paths. For endpoints, use stroke end caps to style the edges.

With these tools, you can fine-tune the look of shapes, whether you're after a soft, rounded feel or clean, sharp angles.

Exercise #6

Vector paths with two or more endpoints

Vector paths with two or more endpoints

Cap styling adds a polished finish to the endpoints of open vector paths, and how you apply it varies with the path's structure. For paths with exactly two endpoints, Figma shows cap properties in the Design panel. This lets you style each endpoint independently, perfect for customizing the look of lines or simple paths.

For more complex paths with over two endpoints, cap styling options appear in the advanced stroke menu. This provides a consistent style to all endpoints, ensuring uniformity in more intricate designs.

To tailor each endpoint separately in multi-endpoint paths, switch to Vector Edit mode and select individual points. This granular control allows for precise customization, ensuring each part of your path aligns perfectly with your design vision.

Exercise #7

Cap styles

Cap styles

Cap styles add a finishing touch to your vector paths, each offering a distinct visual effect:

  • None: Ends the path abruptly with a squared finish, adding no extra length.
  • Line arrow: Places two 45-degree lines at endpoints, mirroring the path's stroke weight. Arrow length is fixed.
  • Triangle arrow: Attaches a triangular arrowhead at both ends. For a single arrowhead, enter vector edit mode.
  • Reverse triangle: A Triangle Arrow pointing inward, giving an introspective flair to your path.
  • Diamond arrow: Ends the path with a solid, impactful diamond shape.
  • Round (default): Softens the path's end with a semi-circular cap, half the stroke weight.
  • Square: Extends the path's end squarely, adding a cap half the stroke weight.

These styles are versatile. Use line arrows for directional flow in user journey maps, triangle arrows for attention in instructional graphics, round for a gentle finish in decorative elements, or square for a structured, geometric look in technical diagrams.

Exercise #8

Union selection

Union selection

Boolean operations help create complex shapes by merging simple ones. They're especially useful when you need to create unique interface components or icons that can't be formed with standard shapes alone.

The Union operation fuses selected shapes into one, ideal for when you need a cohesive visual element. Imagine merging circles to create a cloud shape or uniting rectangles for a custom tab design. It keeps the outermost edges of the shapes while removing the overlaps, applying strokes to the new outer path. This operation is perfect for creating complex icons, innovative button designs, or distinctive background patterns, ensuring a seamless, integrated look.

How to create a union:

Select the shapes you want to combine, then click Union selection in the right sidebar or use the keyboard shortcut:

  • Mac: Option Shift U
  • Windows: Alt Shift U
Exercise #9

Subtract selection

Subtract selection

The Subtract boolean operation in Figma is like a precision carving tool. It excises the area of one or more top shapes from a base shape, keeping only the bottom layer intact.

Imagine crafting a custom donut chart where Subtract removes the inner circle from a larger one, or designing an app icon where a shape is intricately cut out from the background. The Subtract operation is perfect for these scenarios, offering a clear and crisp distinction between elements.

Use Subtract when you need to create hollow spaces or intricate cut-outs in your designs, lending depth and complexity to seemingly simple shapes.

How to apply the intersect operation:

Select the shapes you want to combine, then click Subtract in the right sidebar or use the keyboard shortcut:

  • Mac: Option Shift S
  • Windows: Alt Shift S
Exercise #10

Intersect selection

Intersect selection

The Intersect boolean operation is like a precise filter, keeping only the parts where shapes overlap. It's akin to finding a common ground between elements, resulting in a shape that's the collective intersection of all involved.

Consider using Intersect when crafting a Venn diagram to visually represent shared data points or when designing an intricate logo where only the overlapping parts of various elements should be visible. It's ideal for scenarios requiring a clear visual representation of where multiple components converge.

How to apply the intersect operation:

Select the shapes you want to combine, then select Intersect operation in the right sidebar or use the keyboard shortcut:

  • Mac: Option Shift I
  • Windows: Alt Shift I
Exercise #11

Exclude selection

Exclude selection

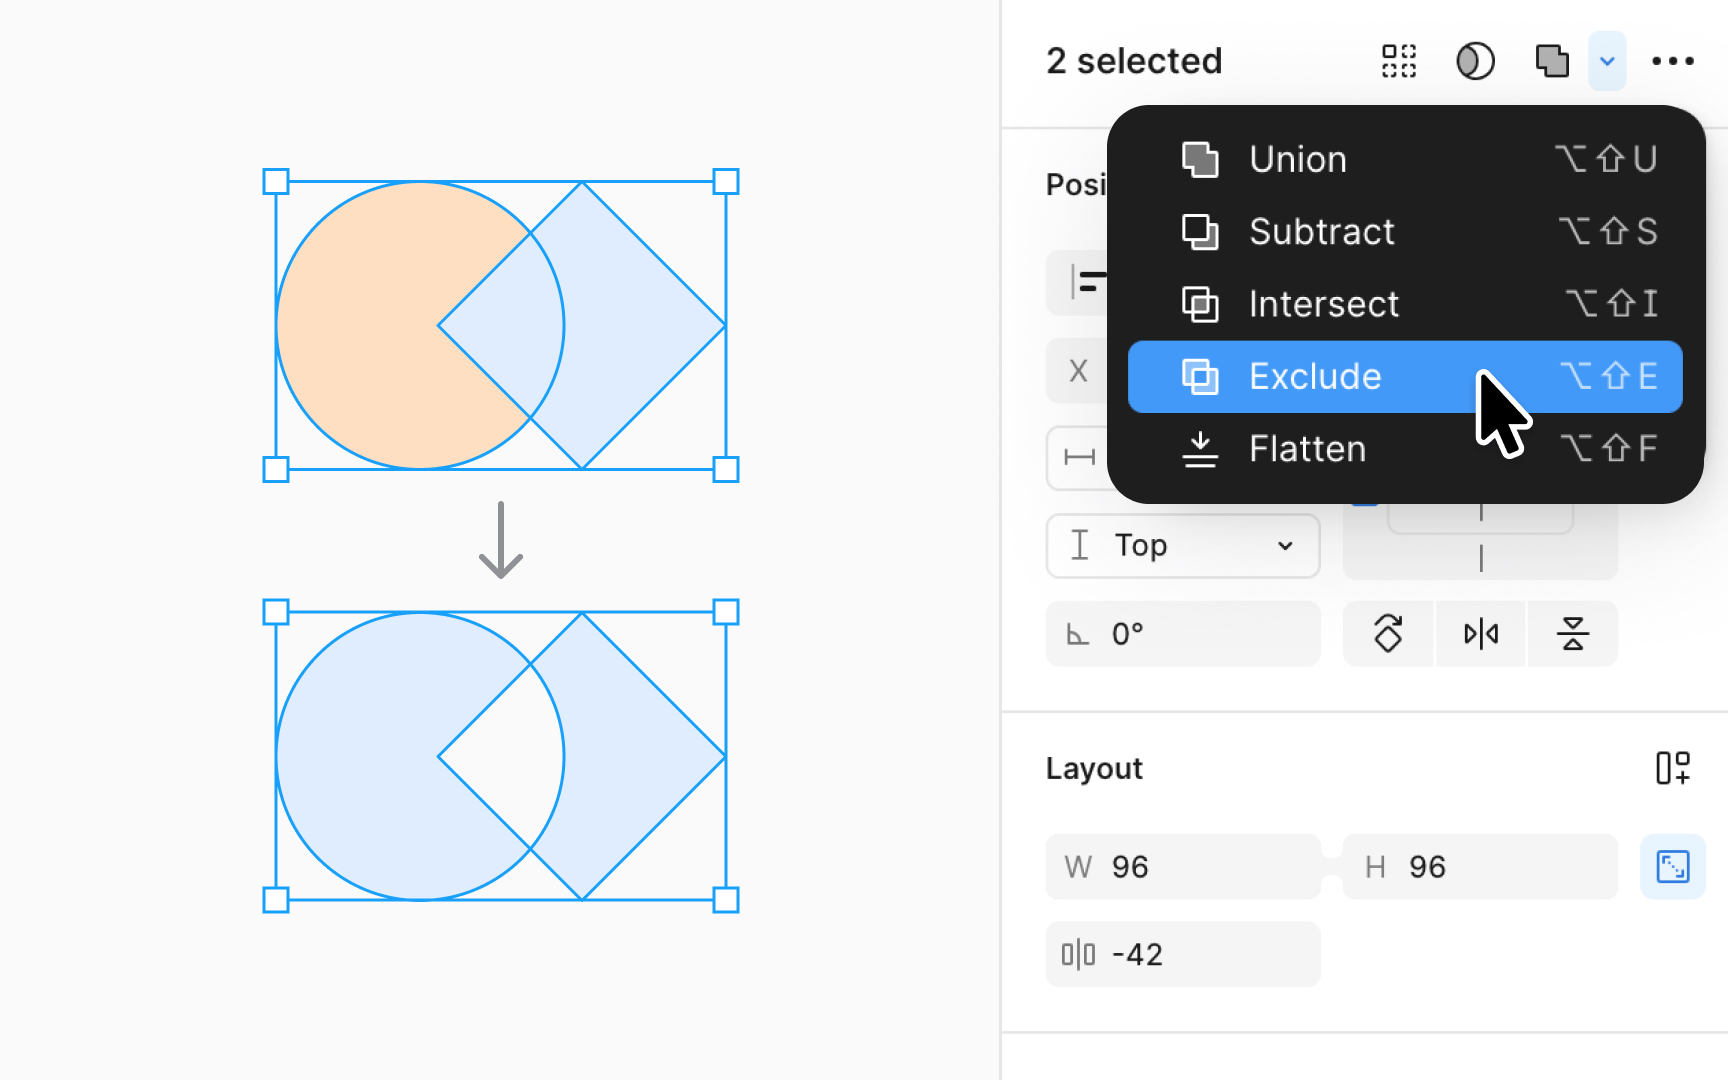
The Exclude boolean operation showcases only the non-overlapping areas of combined shapes. It effectively separates the unique parts of each shape, excluding the common intersection.

Think of Exclude as the tool for creating dynamic, non-overlapping visual elements in UI components like custom badges or intricate patterns. It's perfect when you need to emphasize the distinct areas of overlapping shapes, letting their individual characteristics shine.

How to apply the exclude operation:

Select the shapes you want to combine, then select the Exclude operation in the right sidebar or use the keyboard shortcut:

  • Mac: Option Shift E
  • Windows: Alt Shift E
Complete this lesson and move one step closer to your course certificate