Lists & Paragraphs in Figma
Learn how to format lists and paragraphs in Figma.
Properly formatted text in design enhances readability, hierarchy, and aesthetics. Paragraphs break text into digestible chunks, making content easier to understand, while lists organize information into a clear, concise format, facilitating quick scanning. This organization is crucial for guiding users and improving user experience.
Figma offers extensive features for formatting paragraphs and lists, including alignment, line spacing, and bullet styles. These functionalities allow you to apply consistent styles across your projects, ensuring that text is not only visually appealing but also effectively communicates the intended message.
Numbered lists are ideal for displaying ordered or sequential information in design, such as steps in a process or ranked items.
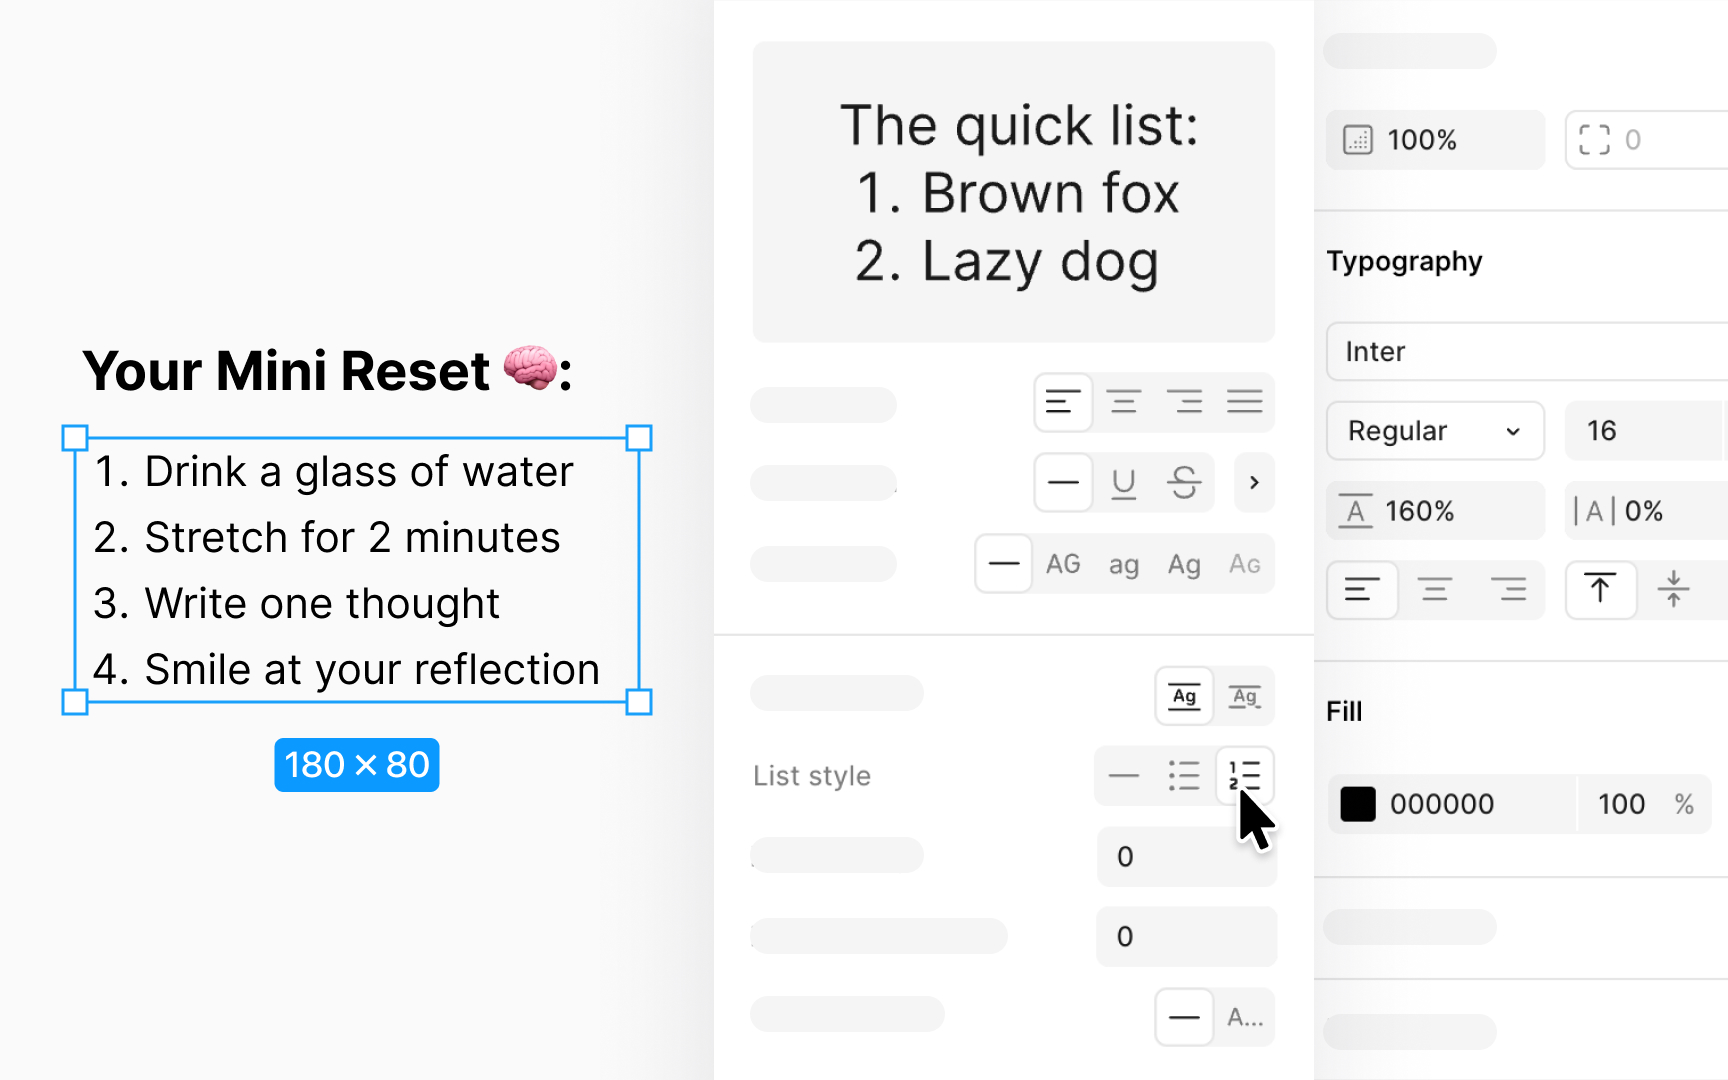
To create a numbered list in Figma, use one of the following ways:
- Use the Text tool (shortcut: T key) and type in "1." or "1)" followed by a space.
- Click on the text layer and head to the Typography section in the Design panel. Click the sliders icon to open Type settings and select Numbered list under List style.
- Hold Command Shift 7 (Mac) or Ctrl Shift 7 (Windows) to turn an individual text selection or multiple text layers into a bulleted list.
Figma allows numbered list counters to cycle through numbers, alphabetical characters, and Roman numerals with each level of indentation, making it easy to present hierarchies of information.

Bulleted lists are perfect for organizing unordered information in design, like features or benefits, where the sequence isn't crucial.
To create a bulleted list in Figma:
- Start with the Text tool (shortcut: T key). You can initiate a bulleted list by typing a dash (-) or asterisk (*) followed by a space. You can also use shortcuts:Option (Mac) 8 or Alt 0 1 4 9 (Windows)
- Alternatively, in Figma's Design panel under
Typography section, click thesliders icon to access Typesettings and choose Bulleted list from the List style options. - For a quick conversion of selected text into a bulleted list, use Command Shift 8 (Mac) or Ctrl Shift 8 (Windows).
Bullets will retain the same styling at all levels of indentation.
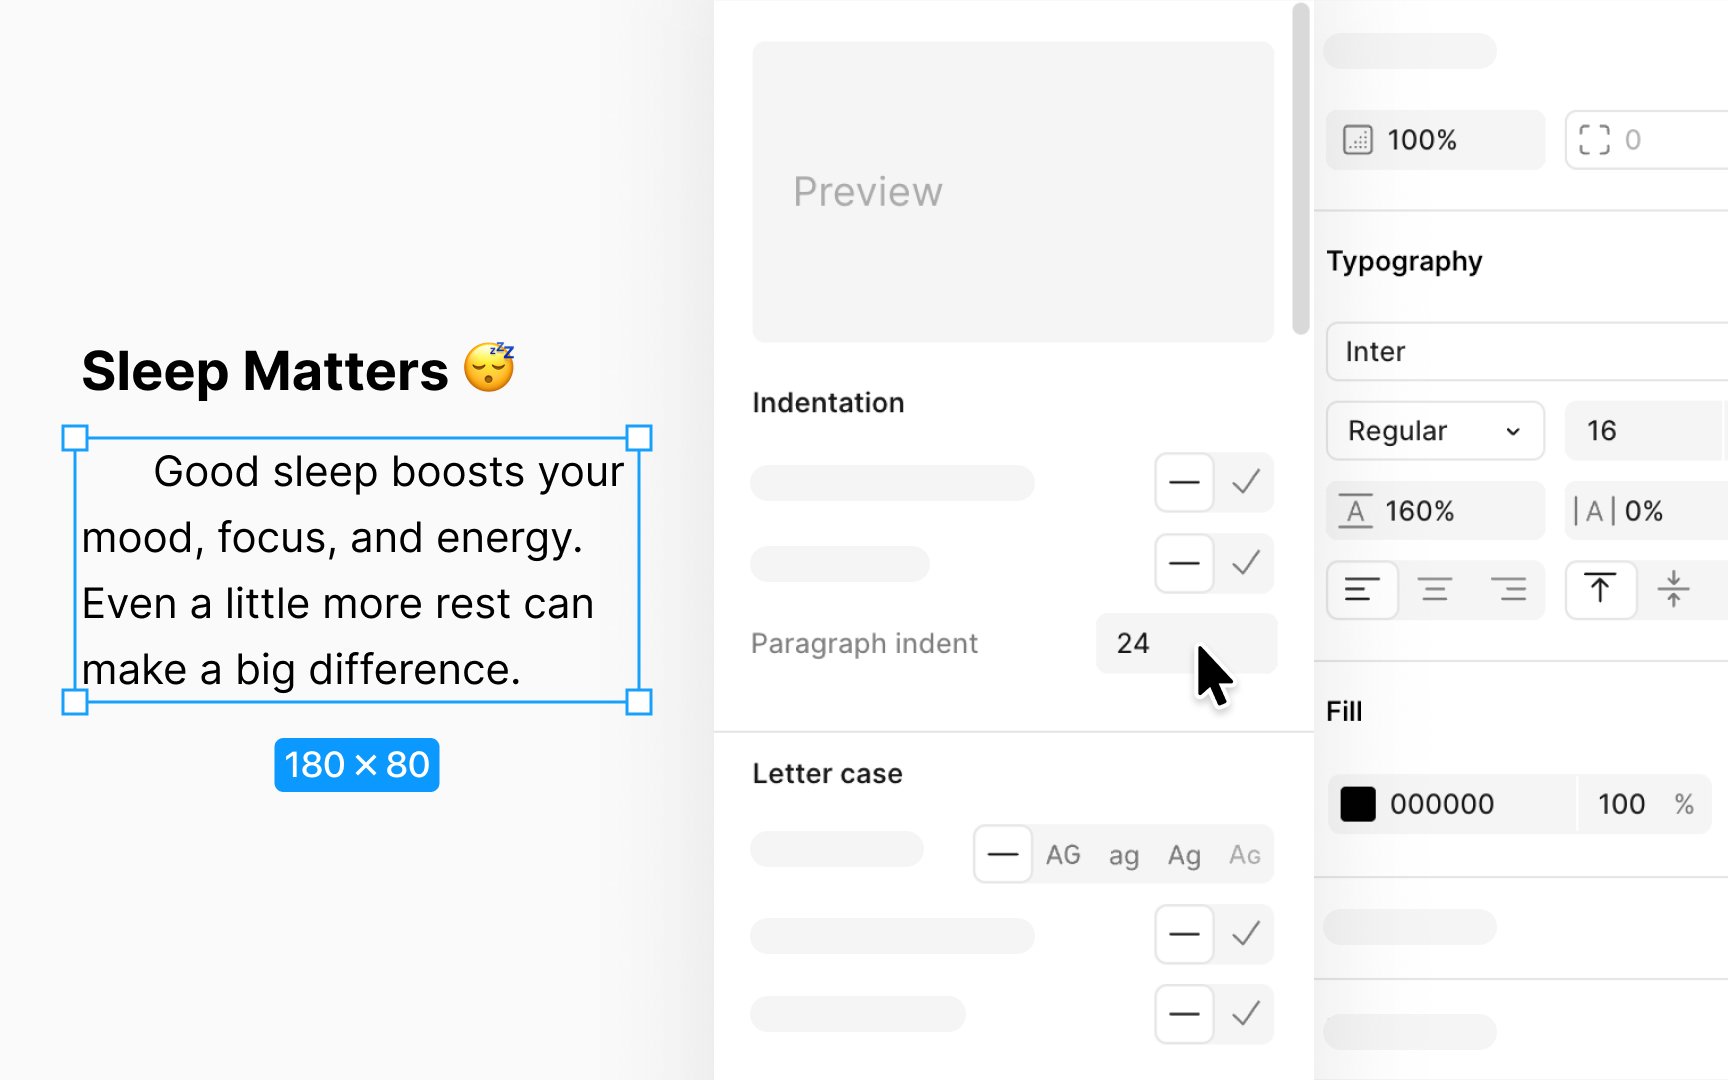
Paragraph indentation involves shifting the start of your first line slightly to the right. It helps indicate the beginning of a new paragraph, making the text easier to follow. Paragraph indentation can only be applied to left-aligned text. Keep in mind, indenting paragraphs affects the entire text layer. If you need to indent just a single paragraph, it's best to place it in its own text layer.
To add a paragraph indent, go to the
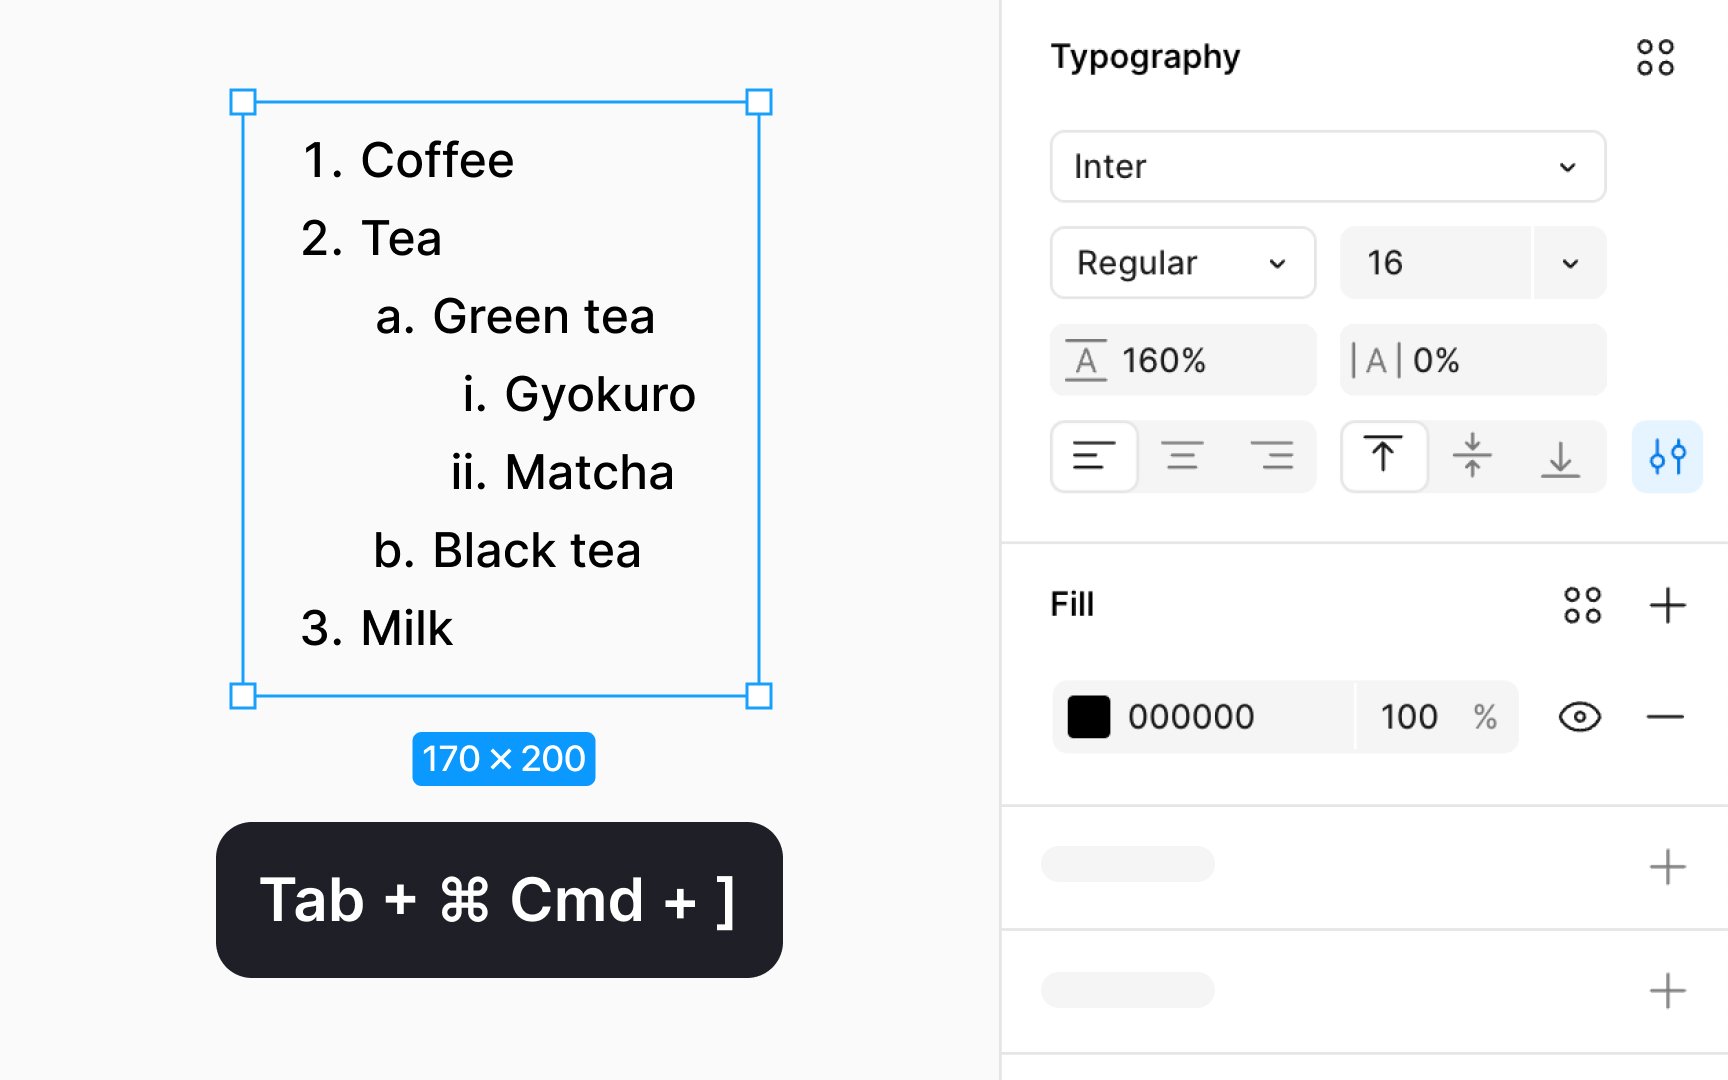
In Figma, both bulleted and numbered lists support up to 5 levels of indentation, allowing for organized, hierarchical information structuring. To adjust a list item's indentation level, use the following methods:
- Increase indentation: Press Tab Command ] (Mac) or Tab Control ] (Windows) to indent a line further. Hitting Tab again will increase the indentation even more.
- Decrease indentation: At the start of a list item, pressing Delete (Mac) or Backspace (On Windows) removes the counter but retains the indentation level. This action can be applied to each line individually. To reduce indentation, place the cursor on an empty list item and press Return (Mac) or Enter (Windows).
List spacing is crucial for enhancing the readability and aesthetic of bulleted or numbered lists by adjusting the distance between each line item. By default, the spacing is set to 0px in Figma, applying to both new lists and any established text styles.
To modify list spacing:
- Select the text within a list or a text layer that contains only list text.
- Enter a
pixel (px) value in the List spacing field in theTypography section of the Design panel to set the desired space between items. - Alternatively, hover over the spacing
icon and drag left to decrease or right to increase the spacing value.
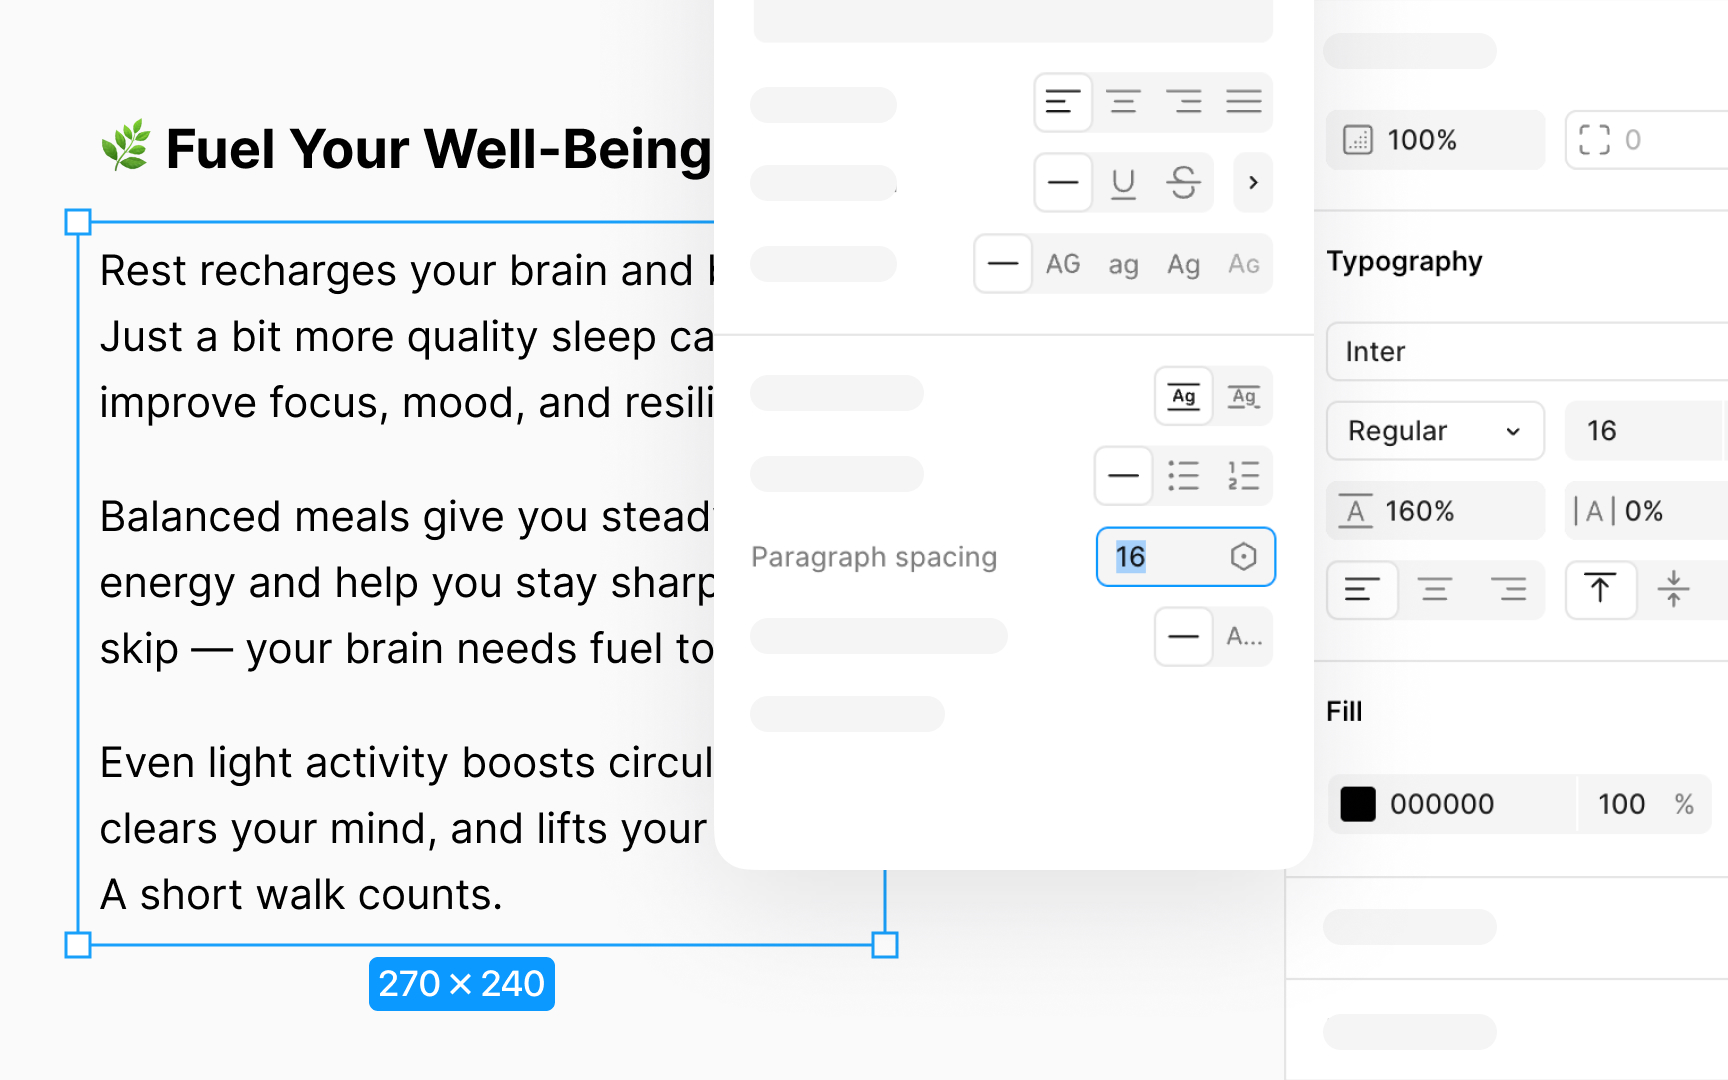
Paragraph spacing lets you fine-tune the space between paragraphs, enhancing the layout and readability of your text. This feature is crucial for creating visually appealing designs with well-structured text.
To adjust paragraph spacing:
- Select the text layer with the paragraphs you wish to format.
- Input a pixel (px) value in the paragraph spacing field in the
Typography section of the Design panel to set the exact distance you want between paragraphs. This value represents the space inpixels and it is set to 0px by default. - Alternatively, you can hover over the spacing
icon and drag left to decrease or right to increase the spacing value, allowing for intuitive adjustments.
Pressing the Enter (Windows) or Return (Mac) creates a new paragraph. This is particularly important to consider if your text is set to Auto width, as it affects how text and spacing are displayed in your design.
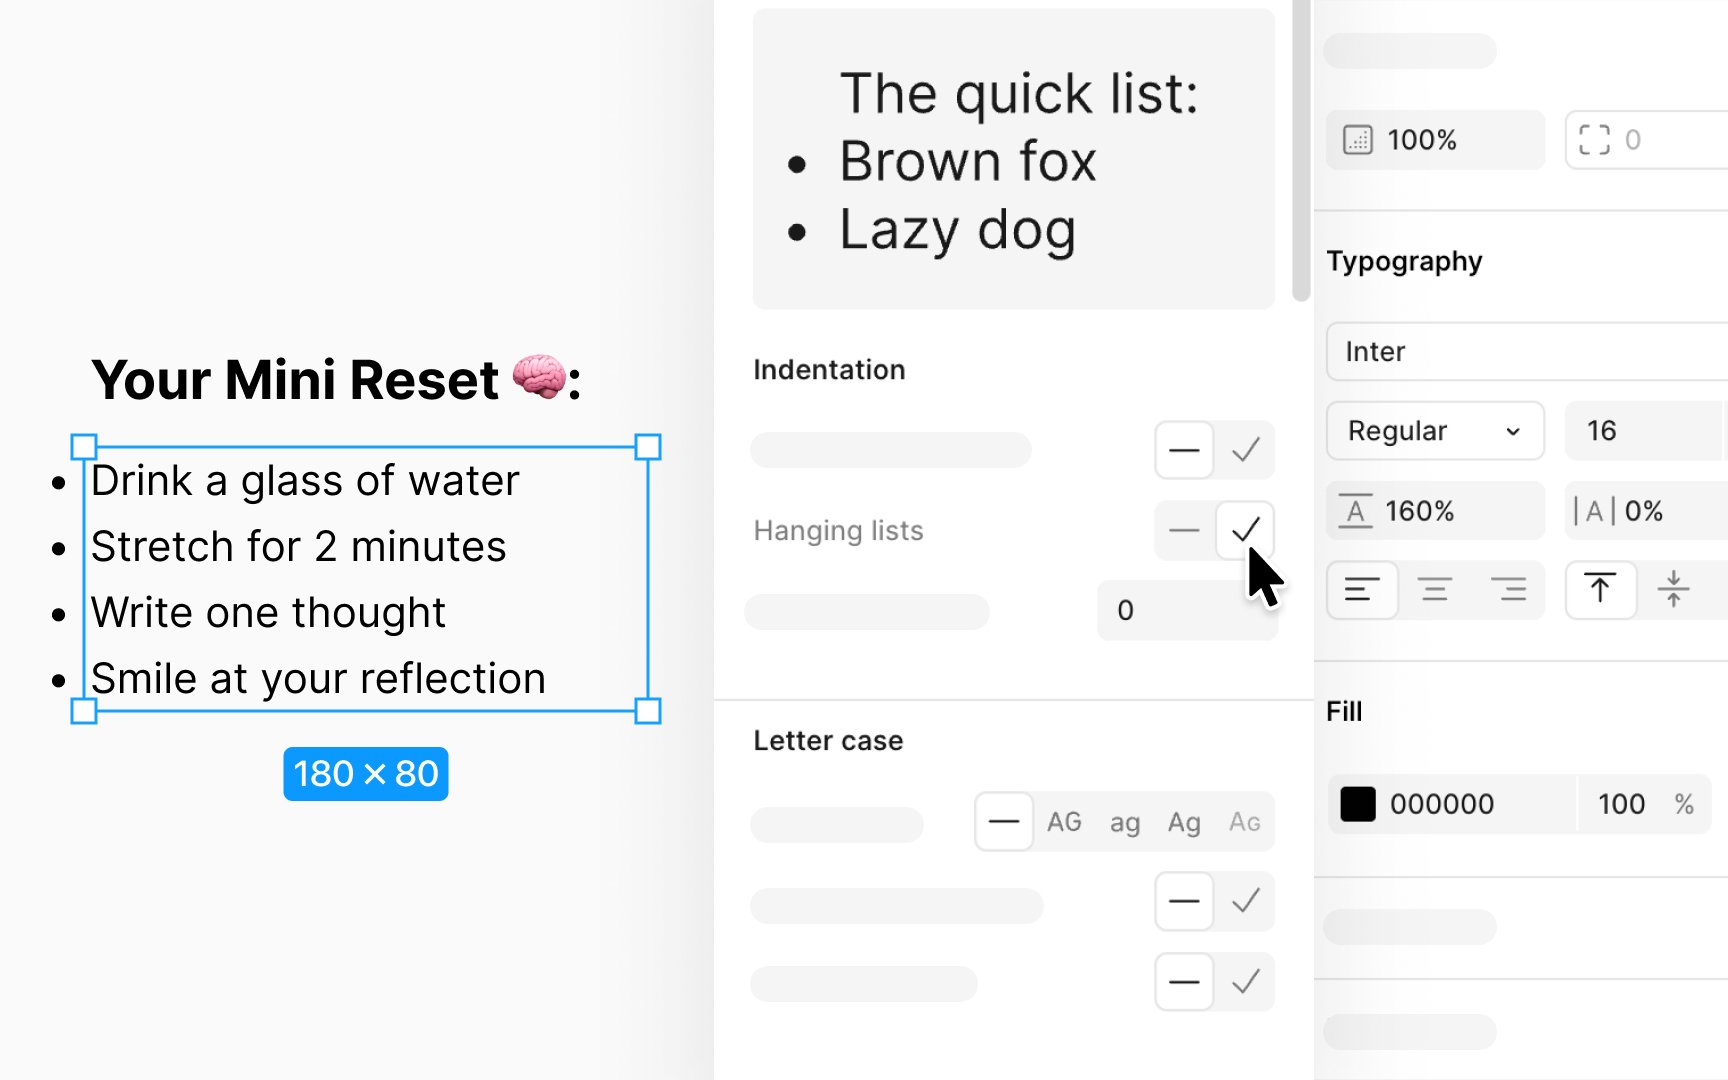
Hanging lists are a formatting option used to align the text of list items (bulleted or numbered) with the bounding box, by moving the bullet points or numbers outside of this box. This style is especially useful in designs where alignment and clean visual flow are priorities, as it ensures the main text aligns uniformly, creating a tidy appearance.
To create hanging lists:
- Select your list in the design.
- Navigate to the
Typography section within the Design panel. - Click on the
sliders icon to open Typesettings . - In the Details window, find the option to toggle Hanging lists and turn it on or off as needed.
Pro Tip: Similarly, you can use the Hanging punctuation toggle to move a text layer's opening quotation marks outside the bounding box.
The color of bullets or numbers in a list is determined by the first character of the first item. Subsequent list items inherit the text color of the preceding item, creating a uniform look.
However, Figma offers flexibility in text color customization. You can change the color of each list item individually, or even apply multiple colors within a single list item to different words or characters. This is achieved by selecting the specific characters, words, or the entire list you wish to modify, and then using the color picker in the Fill section of the Design panel. This feature allows for creative text color variations within lists, enabling you to highlight important information or add visual interest to your lists.
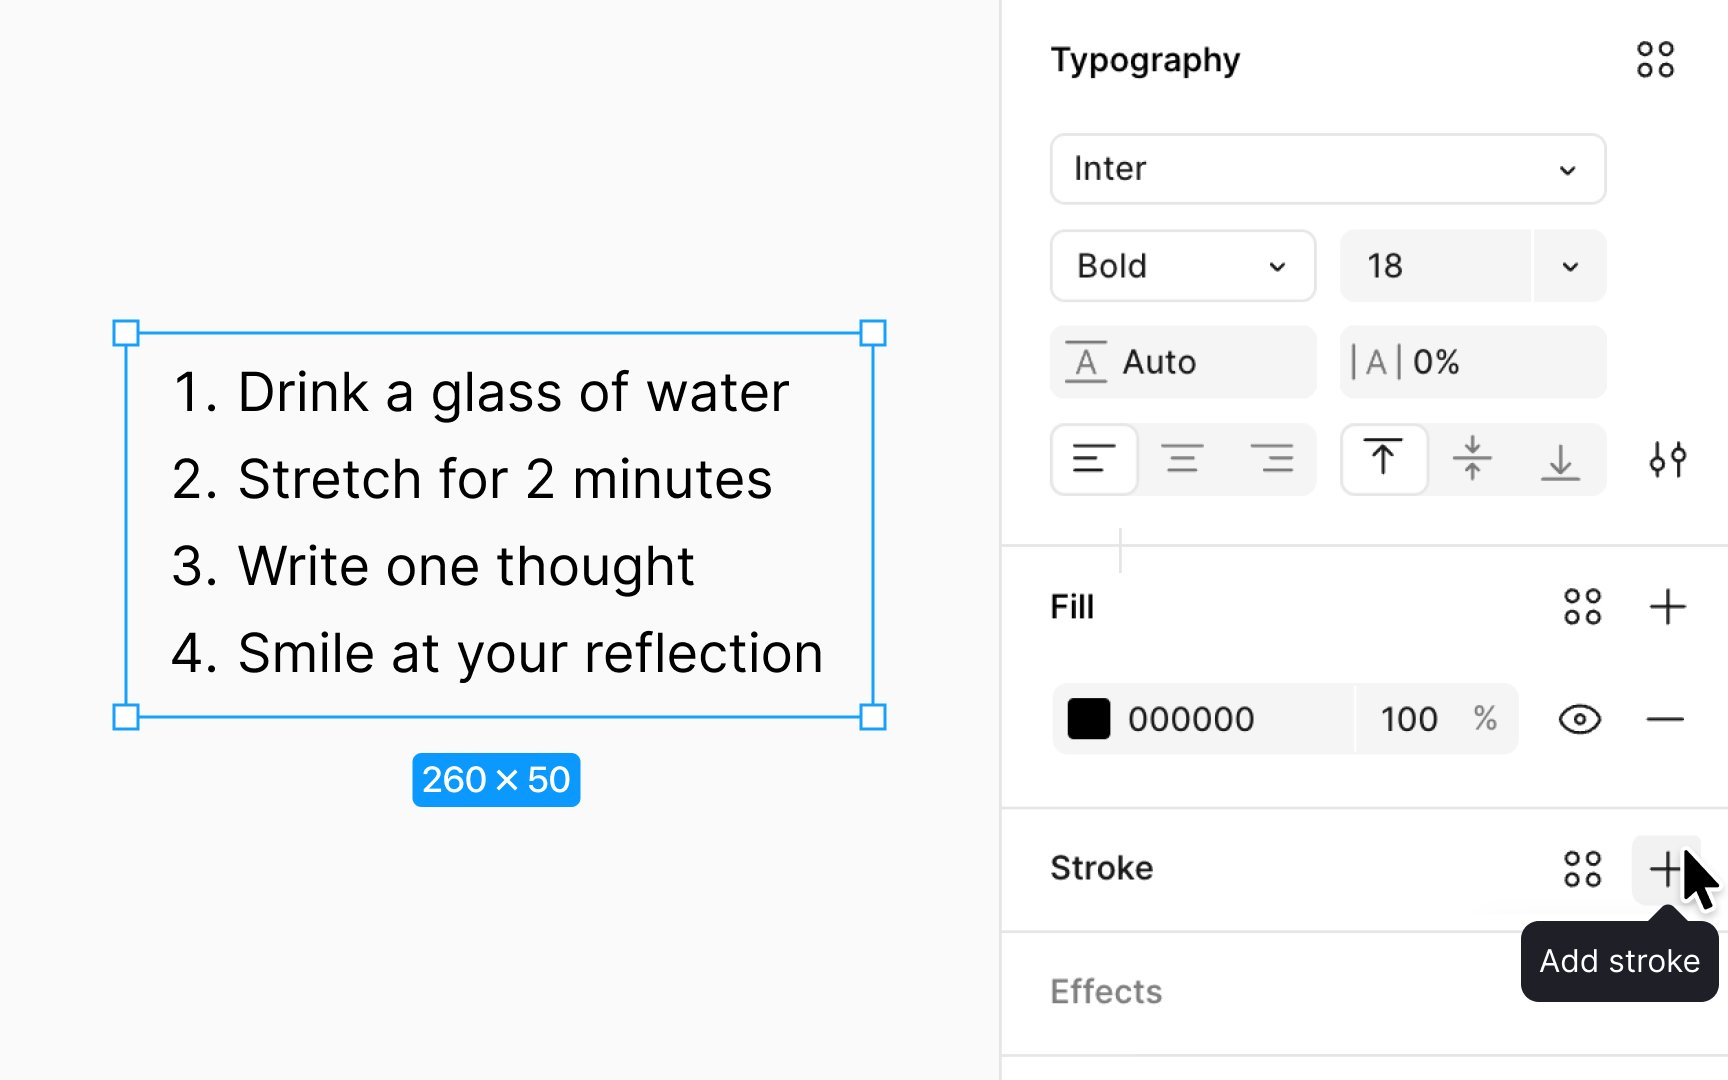
When you apply stroke properties to text in a list, these properties affect the entire selected text layer, including the bullets and numbers. This means if you change the stroke weight or
To modify the stroke of your list text, select the text layer you wish to adjust, then make your changes in the Stroke section of the Design panel. This ensures that the visual style of your list is consistent, with both the text and its accompanying bullets reflecting the same stroke properties.
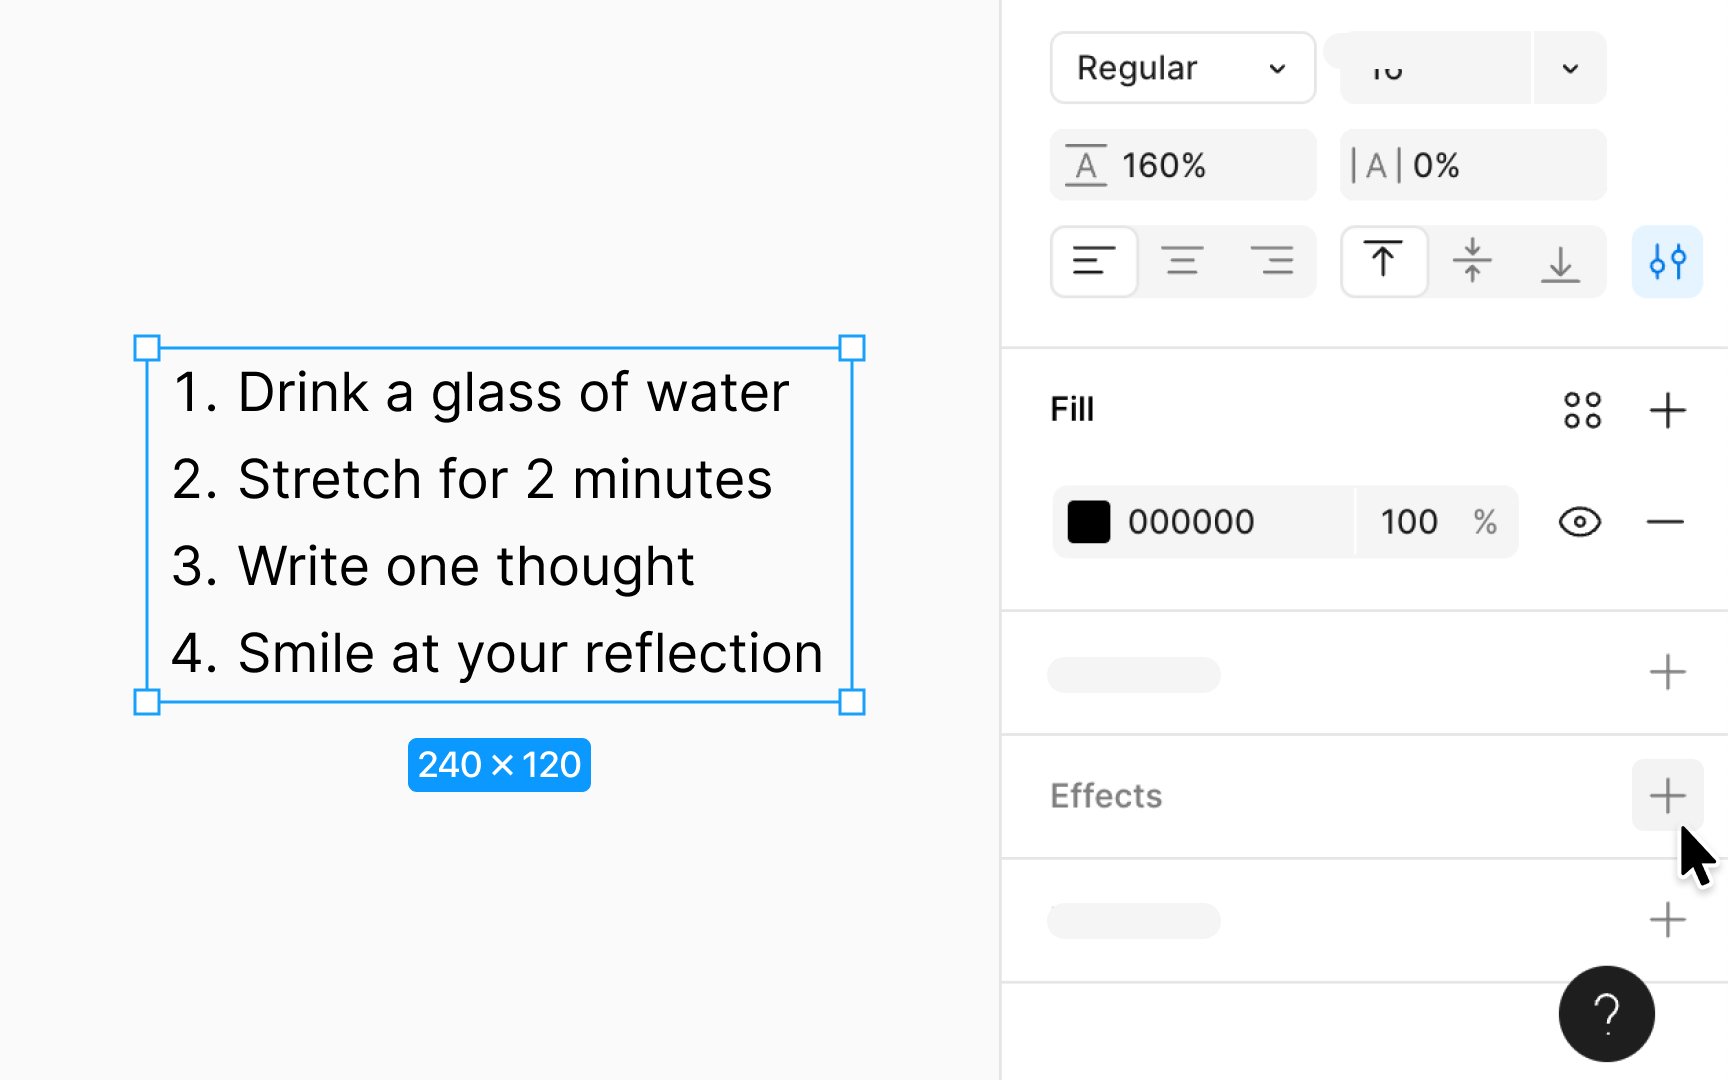
When you apply effects to text within a list, these effects impact the entire selected text layer, containing both the text and any associated bullets or numbers. This ensures that any visual enhancements, such as shadows or blurs, are uniformly applied across all elements of the list, maintaining a cohesive look.
To add a text effect to your list, go to the Effects section of the Design panel and choose from options like Inner shadow, Drop shadow, Layer blur, and Background blur.
If you wish to remove any applied text effects from the list, just select the text you want to modify and click next to the applied effect in the Design panel’s Effects section.
Top contributors

Topics
From Course

Share


