Product Development Lifecycle
Understand the product development lifecycle to successfully shepherd products from concept to market.
The product development lifecycle tracks how products evolve from first ideas to market launch. This journey follows key stages: ideation, validation, prototyping, development, testing, and launch, each with its own challenges and goals. Understanding this cycle helps product managers spot potential problems early, bring different teams together effectively, and handle the connections between tasks that could slow progress. The structure keeps creativity flowing while ensuring practical concerns aren't forgotten. Teams stay focused on shared goals even when facing tough decisions about features or timing. With clear visibility into the development process, companies can better assign people and resources where needed, make smart compromises when necessary, and keep moving forward despite obstacles. While companies may adapt the process to fit their needs, the core stages remain similar across different industries. This consistent approach helps turn identified problems into real solutions that customers actually want and need in the marketplace.
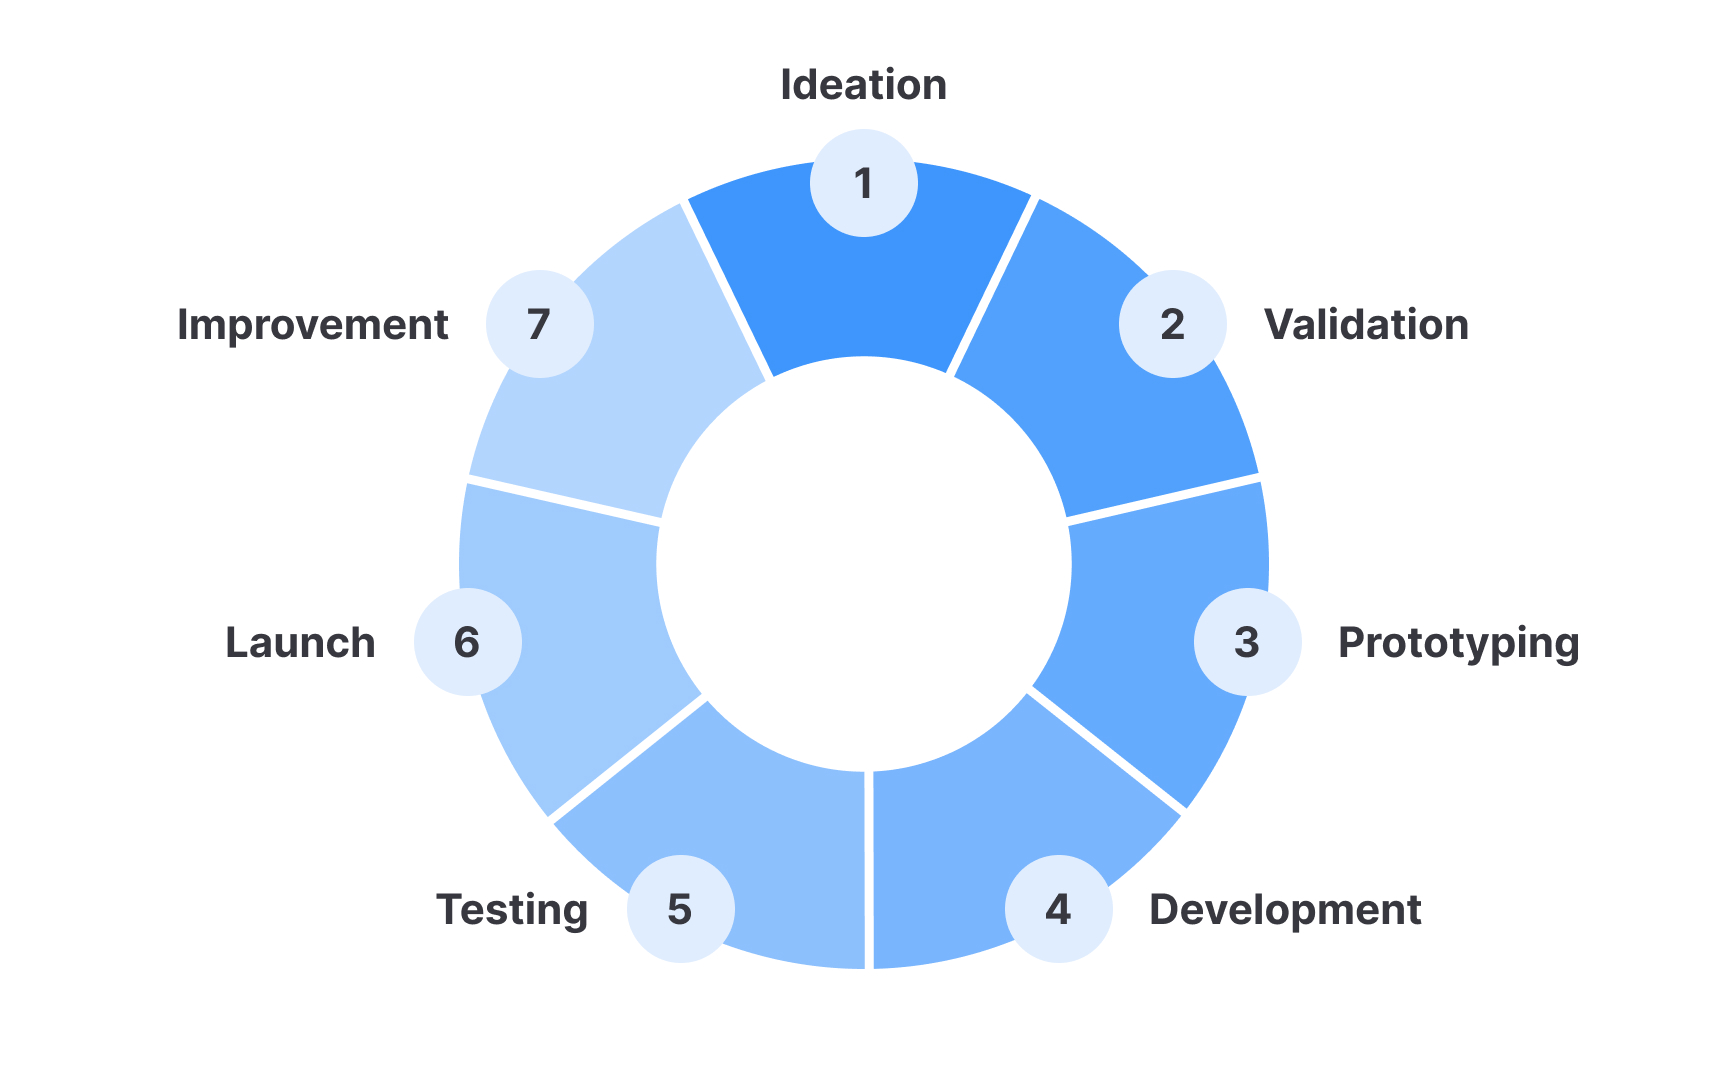
The product development lifecycle gives teams a clear path to turn ideas into market-ready products. This approach breaks down the journey into 7 key stages:
- Ideation: Teams generate creative solutions to problems they've identified
- Validation: Concepts are tested for market fit and technical feasibility
- Prototyping: Early versions are created to collect feedback before a major investment
- Development: The actual product is built based on validated
prototypes - Testing: Quality assurance ensures the product works properly and offers a good user experience
- Launch: The product reaches the market with coordinated cross-team efforts
- Improvement: Post-launch feedback is gathered to enhance the product over time
This lifecycle helps product managers see challenges coming, coordinate teams across different departments, and keep projects moving forward. Companies might adjust these stages to fit their needs, but the basic flow stays similar across industries. By following this structure, teams lower risks, use resources better, and are more likely to create products customers actually want.[1]
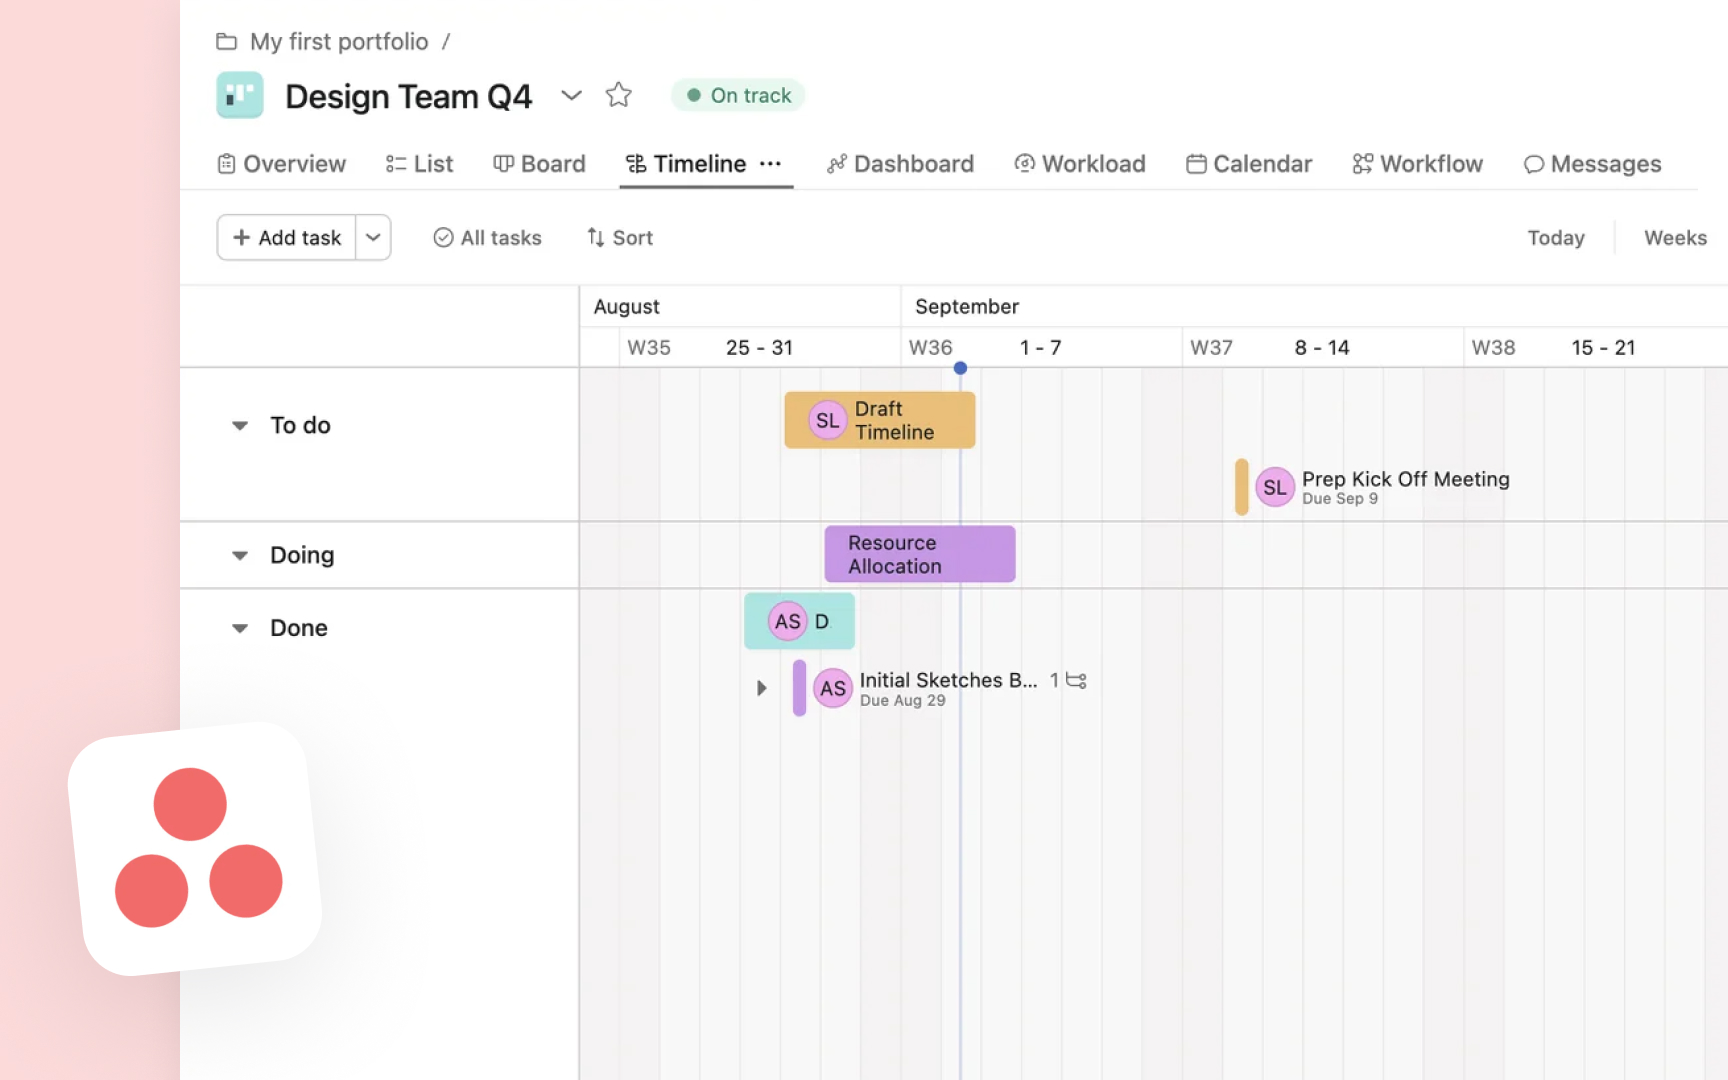
Pro Tip: At the start of a new product project, draw out your development lifecycle with important milestones and share it with everyone involved so the whole team understands the journey ahead.
Starting a successful product journey requires strong foundations in both ideation and validation. These two early stages set the tone for everything that follows in the development lifecycle:
The ideation stage includes:
- Brainstorming sessions to generate potential solutions
- Market research to identify customer pain points
- Competitive analysis to find gaps and opportunities
- Internal evaluation to align with company capabilities
The validation stage includes:
- Customer interviews to verify problems worth solving
- Surveys to measure purchase intent and feature priorities
- Concept testing to gauge interest
- Technical assessments to determine feasibility
During ideation, product teams focus on creativity and possibility, generating many potential directions before narrowing down. The most promising ideas then move to validation, where assumptions are rigorously tested. This stage acts as a critical filter, preventing costly investments in products that lack market demand or technical viability.
Effective validation involves both qualitative and quantitative research methods. Customer interviews provide depth of understanding, while surveys offer breadth across larger populations. Together, they create a more complete picture of potential product-market fit before significant resources are committed to development.[2]
The prototyping and development stages transform validated ideas into tangible products that can be tested and refined.
- The prototyping stage involves creating simplified versions of your product to test key assumptions and gather feedback before committing to full development
- In the development stage, the actual product is built based on insights gathered from prototyping, following established technical specifications and requirements.
Prototyping starts after a concept has been validated but before significant resources are invested in building the complete product. Low-fidelity
During development, engineers and designers work together to transform prototypes into working products. Teams typically organize this work into scheduled sprints or milestones to measure progress. Teammates hold regular meetings to measure progress, while also being flexible enough to adapt when they encounter technical challenges or learn something new.
The testing and launch stages represent critical transition points in the product development lifecycle where products are refined for quality and finally introduced to the market. These phases determine whether your product will succeed with real users.
- The testing stage: This stage focuses on evaluating the product's functionality, usability, and quality through various methods to identify and fix issues before market release.
- The launch stage: This phase involves the coordinated release of your product to the market, including marketing, sales, and support preparations to ensure a successful introduction.
During testing, products undergo several types of checks. Quality assurance looks for technical bugs, while user testing shows how real people interact with the product. Teams also test how well the product performs in different situations and make sure new changes don't break existing features. This step-by-step approach helps catch problems when they're still easier and cheaper to fix.
The launch stage turns a tested product into something customers can buy. This means finalizing marketing materials, preparing support teams, setting up sales channels, and creating ways to track how well the product is doing. A good launch needs teams across the company to work together with clear timing. Many companies start with an internal release or beta with a small group of dedicated users before making the product available to everyone.
Pro Tip: Create a pre-launch checklist that includes all critical tasks across departments to ensure nothing falls through the cracks as you approach your launch date.
The improvement stage starts a continuous cycle rather than ending development. This final phase focuses on gathering real-world feedback and making changes to make the product better over time.
Once a product launches, the real learning begins. Users interact with it in ways you couldn't fully predict during testing, revealing opportunities for enhancement. Teams gather data through analytics, customer support interactions, surveys, and direct user feedback. This information helps prioritize improvements that will have the greatest impact on user satisfaction and business goals. Successful products evolve through multiple iterations. Each update cycle includes analyzing feedback, prioritizing changes, implementing improvements, and measuring results. This ongoing process helps products stay relevant as user needs change and market conditions evolve. Companies that excel at post-launch improvement often gain significant advantages over competitors who consider development complete after initial launch.
Pro Tip: Set up automated systems to continuously collect user feedback and usage data so you can spot improvement opportunities quickly without having to manually gather information.
Dependencies create connections between tasks, teams, and decisions throughout product development. Managing these relationships prevents delays and maintains momentum.
Product development involves several dependency types between tasks:
- Finish-to-Start (most common): A task cannot begin until another task completes
- Start-to-Start: A task cannot start until another task starts
- Finish-to-Finish: A task cannot finish until another task finishes
- Start-to-Finish: A task cannot finish until another task starts
Dependencies can create bottlenecks, delay progress, increase risk, and complicate resource allocation if not managed properly.
In product development, dependencies occur when one task relies on another task's progress. For example, development often cannot begin until designs are approved, and testing cannot start until development reaches a certain point. These connections exist not just between tasks but also between teams. The
Effective dependency management requires identification and documentation. Teams should map out which tasks depend on others, who is responsible for each, and how delays might impact the timeline. Visual tools like Gantt charts make these relationships clear. Regular cross-team check-ins help track progress, identify potential bottlenecks early, and adjust plans when needed.[4]
Creating realistic timelines is critical for successful product development. Effective planning accounts for dependencies, resource constraints, and the inherent uncertainty of creating new products.
When developing product timelines, consider these key elements:
- Milestone planning: Identify major checkpoints that mark significant progress points
- Dependency accounting: Build in time for handoffs between teams and tasks
- Resource allocation: Ensure team members aren't overbooked across multiple tasks
- Buffer inclusion: Add extra time for unexpected challenges and scope adjustments
Timeline planning starts with breaking down the product development process into manageable phases and tasks. Each task should have a clear owner, estimated duration, and defined dependencies. Gather input from the teams who will do the work to make estimates more accurate — engineers know how long coding will take better than product managers do.
Avoid the common mistake of creating overly optimistic schedules. Use historical data from previous projects to improve estimates. When uncertainty is high, use ranges rather than specific dates, and refine them as you learn more.
Pro Tip: Review your timeline with experienced team members who can spot potential issues or unrealistic expectations before you finalize and share it with stakeholders.
Even with careful planning, product development timelines rarely go exactly as scheduled. Successful product managers anticipate challenges and develop strategies to address them.
Common timeline challenges include:
- Scope creep: Features or requirements expand beyond initial plans
- Resource constraints: Team members become unavailable or overcommitted
- Technical obstacles: Unexpected problems arise during development
- External dependencies: Delays from third-party integrations or approvals
- Changing priorities: Strategic shifts require timeline adjustments
When timelines slip, product managers must make tough choices about how to respond. Options include cutting features, pushing back deadlines, adding team members, or accepting lower quality. The best approach depends on project goals, market needs, and how much flexibility you have.
Clear communication is vital when timeline changes are needed. Stakeholders should know what's changing, why it's necessary, and how it affects the overall product plan. Being open builds trust, even when sharing bad news about delays. Write down all changes so everyone works from the same updated schedule.
Pro Tip: When facing timeline challenges, focus first on preserving core features that deliver the main customer value. Non-essential features can often be delayed to later releases.
Even well-designed product development processes can be improved over time. Optimization involves finding inefficiencies, making improvements, and measuring their impact.
To optimize your product development lifecycle, focus on these areas:
- Process bottlenecks: Points where work consistently slows down or gets stuck
- Communication gaps: Breakdowns in information sharing between teams
- Rework cycles: Areas where work frequently needs revision after completion
- Decision delays: Situations where progress stalls waiting for approvals
Start optimization by gathering data on your current process. Track how long different stages take, where delays happen most often, and which teams face the most problems. Look for patterns across multiple projects to find ongoing issues rather than one-time problems.
Once you've identified areas to improve, make changes gradually. Start with small adjustments to test if they work before making big process changes. Include the teams affected by these changes in the planning process, as they often have the best ideas about what will work. After making changes, keep measuring results to confirm they're creating the benefits you expected.
Pro Tip: Set up regular retrospectives after each product release to capture fresh insights about process strengths and weaknesses while the experience is still fresh in everyone's minds.
References
Top contributors

Topics
From Course

Images provided by

Share


Similar lessons

Product Development Stages

Opportunity Ideation
